
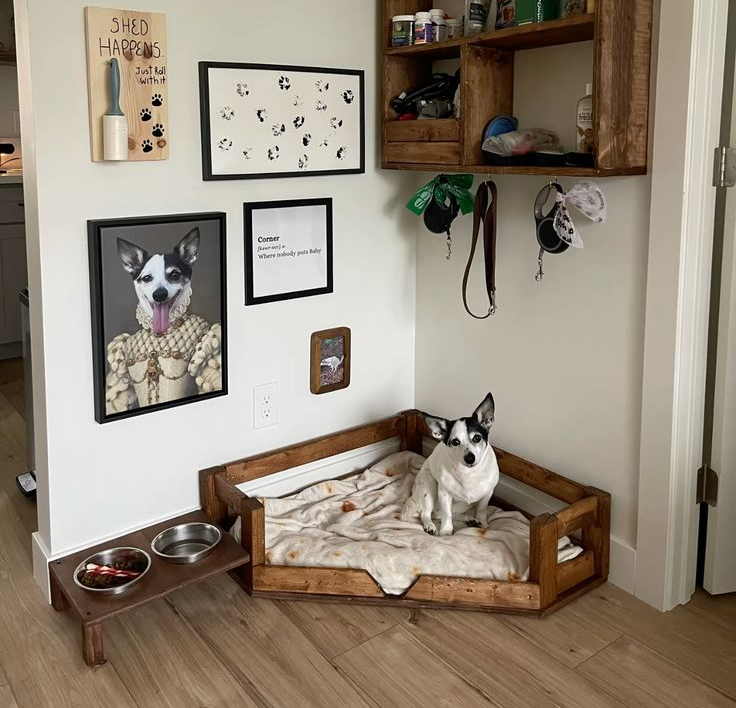
My dog Biscuit spent the first year I had her sleeping in whatever spot got the most foot traffic — the bottom of the stairs, right in front of the fridge, directly in the hallway bottleneck between my bedroom and the bathroom.
It took me embarrassingly long to realize she wasn’t picking those spots because she liked chaos.
She was picking them because she didn’t actually have a spot of her own, so she was defaulting to wherever she could keep an eye on everyone.
A dog nook sounds like a small thing, and in square footage it usually is, but it changes how a dog moves through your house once they have an actual designated place that’s theirs.
This isn’t about buying a $400 dog house that matches your sofa — some of the best nooks on this list cost under $50 and use space you’re already wasting, like the dead zone under a staircase or the gap beside a bookshelf.
I’m covering the full range here: small-space and apartment options, bigger builds if you’ve got a mudroom or a spare closet, and the stuff that actually matters for comfort and durability that a lot of “cute dog corner” posts skip entirely — like why the wrong flooring under a nook can undo the whole thing in a month.
1. The Under-Stairs Nook

Why it works: this is genuinely the most-requested layout I get asked about, because almost every house with a staircase has this dead triangular space doing absolutely nothing. It’s naturally enclosed on two or three sides, which a lot of dogs actually prefer over an open bed in the middle of a room — it reads as a den, not just a cushion.
How to do it: measure the tallest point of the triangle first, since that determines whether you’re fitting a full bed setup or just a low cushion — most under-stair spaces only give you real height in the first two or three feet before the ceiling slopes down too much to be usable.
Pro tip: add a small vent or leave the back panel slightly open if you’re building this out with a full enclosure. Under-stair spaces trap heat more than people expect, especially in summer, and a dog that’s too warm will just abandon the nook entirely no matter how nice it looks.
2. Built-In Kitchen Cabinet Nook
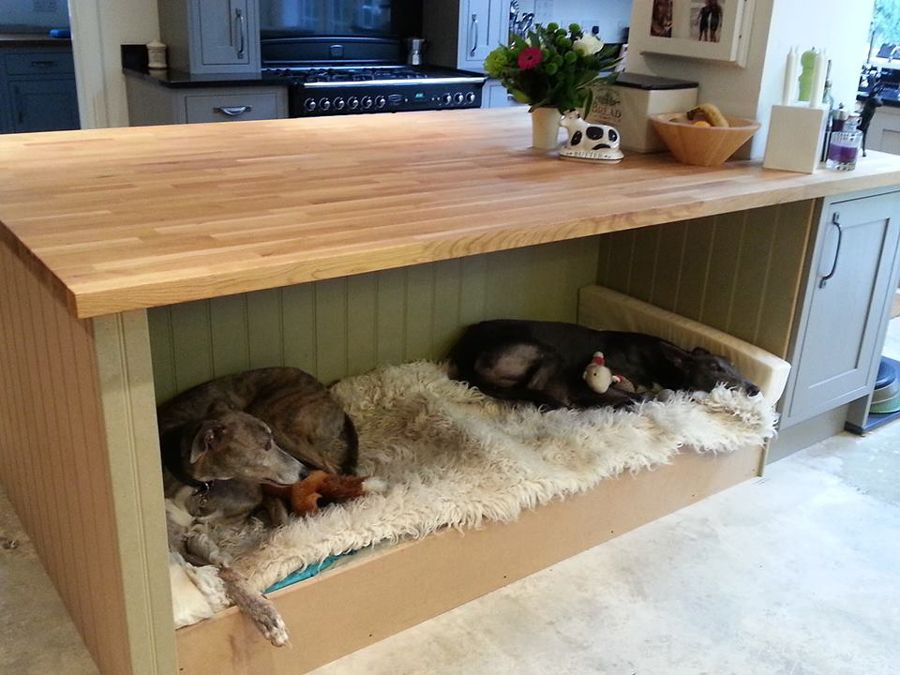
Why it works: I know someone who converted an unused lower cabinet next to her kitchen island into a dog bed, and it’s honestly one of the smartest small-space solutions I’ve seen — the dog gets to be in the kitchen where the action is without being underfoot, and the cabinet door means you can close it off during cooking if you need the floor space.
How to do it: remove the cabinet door entirely or install it on a magnetic catch so it stays open, cut a doorway-sized opening if the existing door is too narrow, and add a washable pad or bed liner instead of built-in cushioning so you can pull it out and wash it.
Pro tip: skip any cabinet near the oven or dishwasher — both throw off more heat and noise than you’d think, and a nervous dog will avoid the spot even if it looks perfect.
3. Window Bench Nook
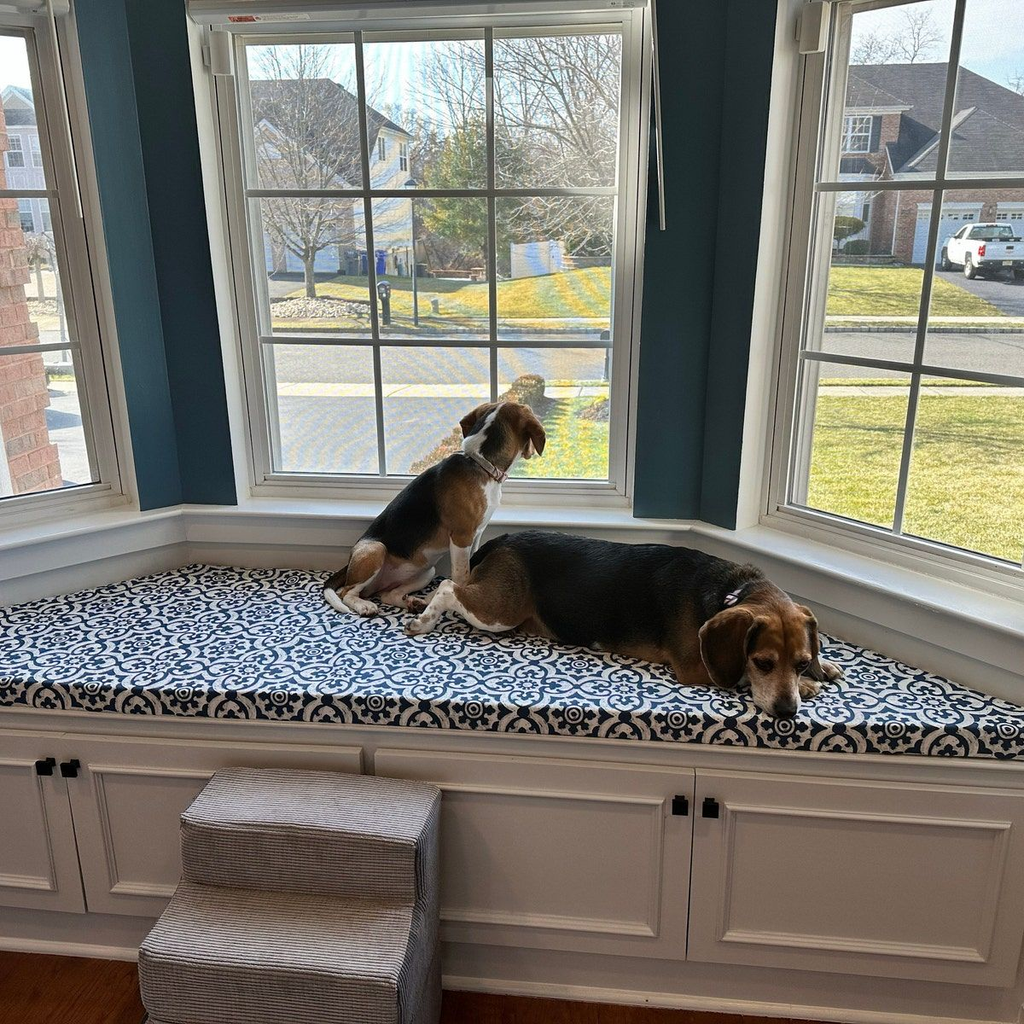
Why it works: dogs that like to watch the street, the yard, or the neighbor’s cat do genuinely better with a nook that has a view than one tucked into a quiet corner — it gives them something to do besides just sleep, which cuts down on the boredom-barking that a lot of window-avoidant dogs develop instead.
How to do it: build or buy a low bench at window height, sized to your dog rather than to standard furniture dimensions — a bench built for a Labrador is way oversized for a dachshund, and the extra empty space just makes the nook feel less like “theirs.”
Pro tip: check the window’s actual sun exposure at different times of day before committing to this spot. A window that looks shaded in the morning when you’re deciding on the layout can turn into a greenhouse by 2pm, and dogs will abandon a nook that gets too hot fast.
4. Closet Conversion Nook

Why it works: an underused hall closet or a section of a walk-in is one of the best options if you want a fully enclosed, quiet nook — especially good for anxious dogs or dogs that need a decompression spot away from guests, kids, or other pets.
How to do it: remove the door or swap it for a curtain (a solid door can feel too much like a crate and make some dogs anxious about being shut in, even with it open), add a washable bed, and keep at least one wall exposed to airflow rather than converting a fully sealed interior closet.
Pro tip: a reader once told me she added a small battery LED puck light inside her closet nook, and it made a bigger difference than she expected — a pitch-dark enclosed space can actually discourage some dogs from using it, even ones that seem to want a den-like spot.
5. Under-the-Desk Nook
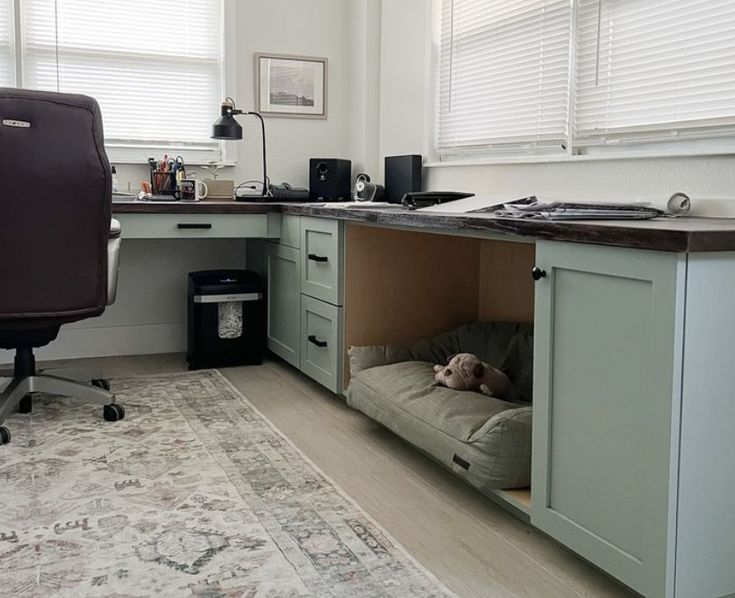
Why it works: if you work from home, this is the layout that actually gets used daily instead of becoming a decor piece your dog ignores — dogs that are attached to their person tend to gravitate toward wherever that person spends the most hours, and a nook under your desk works with that instinct instead of against it.
How to do it: use a low, open-front bed rather than anything enclosed, since you want your dog to be able to see your feet and legs and not feel boxed in while you’re moving around above them.
Pro tip: cable management matters more here than in any other nook on this list. Route or sleeve any exposed cords, because a bored dog parked under a desk all day will eventually find them.
| Nook Type | Best For | Space Needed | Difficulty |
|---|---|---|---|
| Under-stairs | Houses with a staircase, den-loving dogs | Small-Medium | Medium |
| Kitchen cabinet | Small kitchens, dogs who want to be near the action | Small | Easy-Medium |
| Window bench | Alert or curious dogs, apartments with good light | Small-Medium | Easy |
| Closet conversion | Anxious dogs, dogs needing a quiet retreat | Small | Easy |
| Under-desk | Work-from-home households | Small | Easy |
6. Mudroom Nook
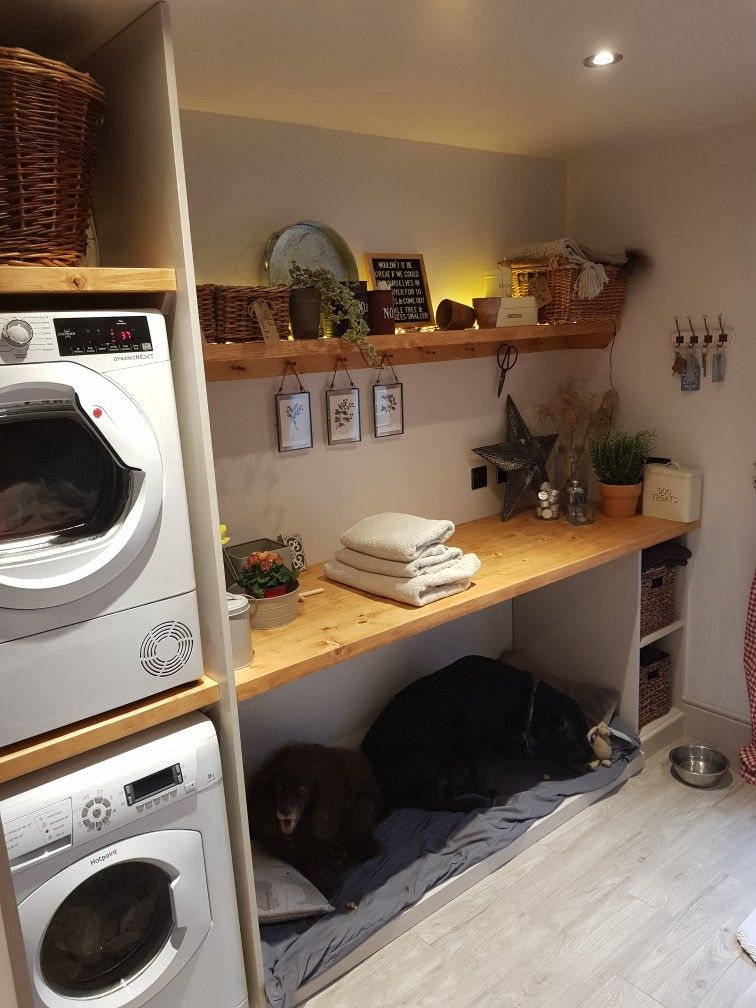
Why it works: if you’ve got a mudroom, this is the most practical spot on the list — it’s already built for mess, it’s usually near a door for easy outdoor access, and it keeps muddy paws and dog gear contained to one zone instead of spreading through the house.
How to do it: build a raised platform bed rather than putting bedding directly on mudroom flooring, since mudroom floors are often tile or stone and get genuinely cold in winter — a few inches of lift makes a real difference in comfort.
Pro tip: add a boot tray or a washable mat directly outside the nook opening, not just inside it. Most of the water and mud gets tracked in the first two steps past the door, and catching it there saves the actual bed from getting soaked.
7. Bookshelf Gap Nook
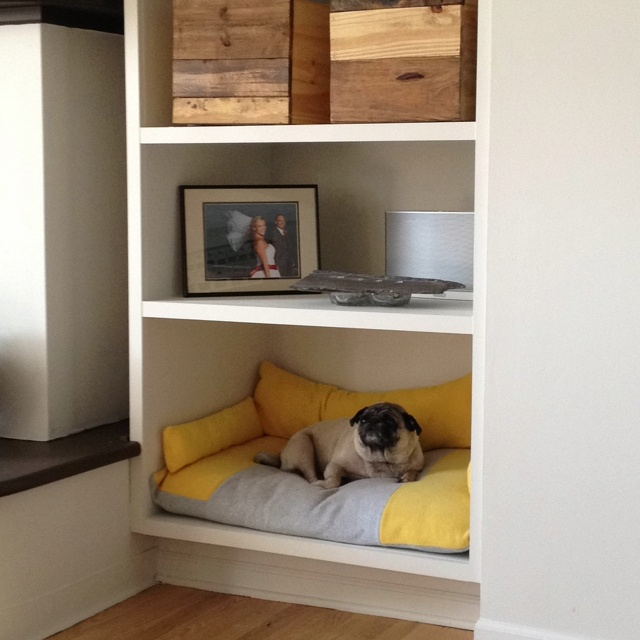
Why it works: this is the move for anyone in a small apartment with zero spare square footage — building a low, open cubby into the bottom row of an existing bookshelf or building unit gives you a nook without claiming any new floor space at all.
How to do it: remove or reposition the bottom shelf to create a gap at least a few inches taller than your dog standing, and line the back and sides with a removable cushion rather than anything permanently attached, in case you want to reconfigure the shelf later.
Pro tip: this only works if the shelving unit is anchored to the wall or genuinely stable. I’d skip this one for any freestanding unit that isn’t secured — a curious dog investigating a new spot is exactly the scenario that tips over unanchored furniture.
8. Under-the-Stairs-Landing Nook (Mid-Staircase)
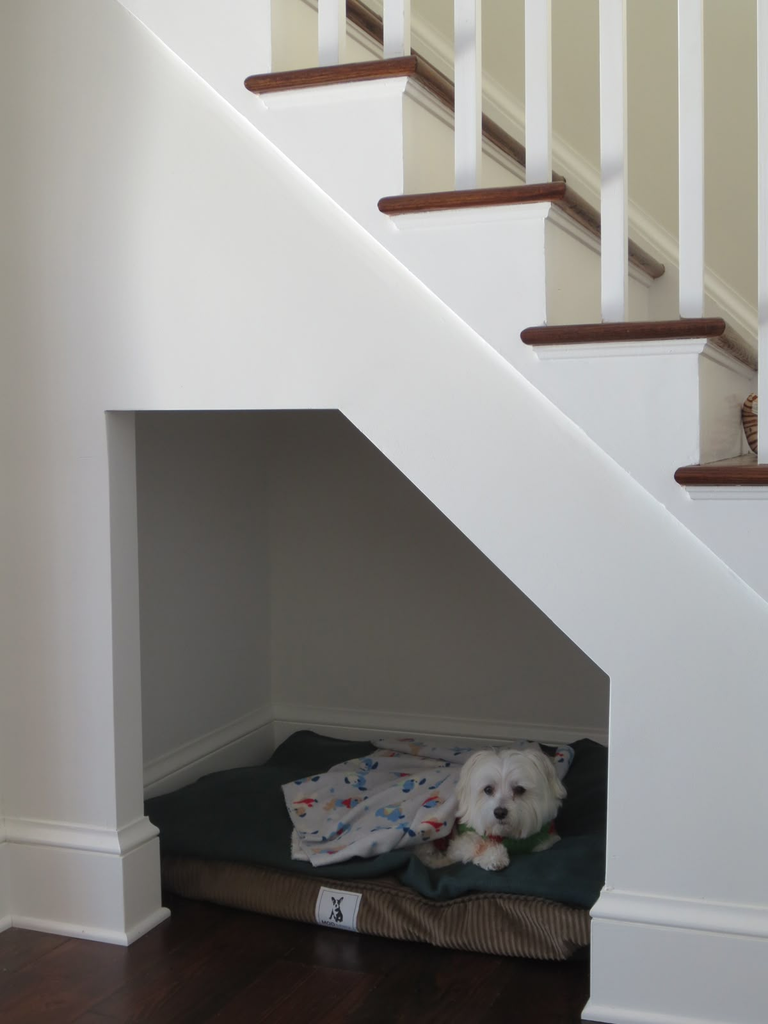
Why it works: this is a variation on the classic under-stairs idea, but for houses with a landing or a turn partway up — that flat pocket of space is usually smaller than the ground-floor triangle but works well for smaller dogs, and it puts the nook somewhere your dog will actually pass by multiple times a day.
How to do it: measure carefully, since landing nooks tend to be tight on width even when they’re tall enough — a narrow, deep bed usually fits better here than a wide, shallow one.
Pro tip: add a small gate or barrier if you’ve got a dog that’s still a puppy or has any mobility issues, since a landing nook right next to a staircase edge is a genuine fall risk that a lot of people don’t think about until after the fact.
9. Fireplace Alcove Nook
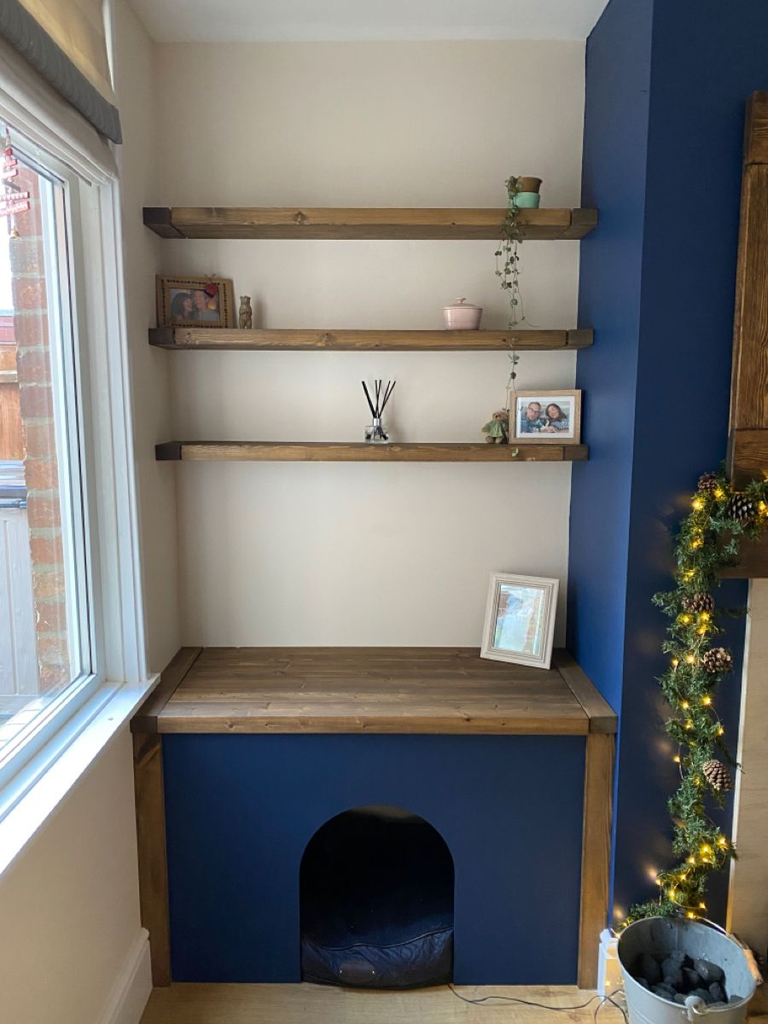
Why it works: the empty space beside a fireplace, especially in older homes with a built-in alcove on one or both sides, is almost always underused, and it puts your dog’s nook in one of the warmest, coziest parts of the house during colder months.
How to do it: keep the bed at least a foot away from the fireplace opening itself for safety, and use a washable, non-flammable-rated bed material given the proximity to heat.
Pro tip: this spot gets genuinely too warm if you’ve got a working fireplace and use it often — watch your dog’s behavior the first few times you have a fire going, and be ready to relocate the bed temporarily if they seem to be avoiding the heat rather than enjoying it.
10. Laundry Room Nook

Why it works: laundry rooms are already utilitarian, already have durable flooring, and are usually tucked away from main living spaces — which makes them a solid pick for dogs that like some separation from household noise but still want to be near people doing chores.
How to do it: keep the bed away from the direct path of the washer and dryer doors, and pick a spot that isn’t directly under a vent, since dryer heat exhaust can make one corner of a laundry room noticeably warmer or louder than the rest.
Pro tip: laundry rooms are one of the few nook spots where I’d actually recommend a raised bed over a floor cushion — the hard flooring most laundry rooms have (tile, vinyl, concrete) gets cold, and a few inches of elevation solves that without much cost.
11. Entryway Bench-with-Storage Nook
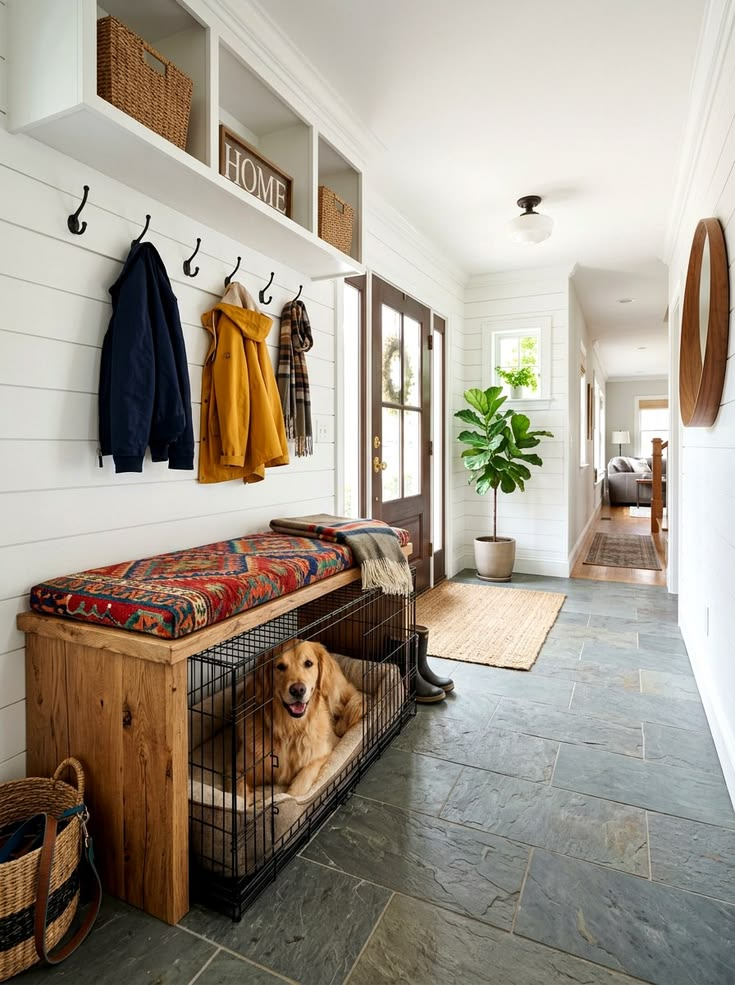
Why it works: an entryway bench with an open lower cubby does triple duty — shoe storage up top, a dog nook underneath, and it’s usually already a high-traffic spot your dog wants to be near anyway, since it’s where you come and go.
How to do it: buy or build a bench with at least 12-14 inches of clearance underneath for a small-to-medium dog, and add a removable bolster-style bed that can handle wet paws and dropped mail without much fuss.
Pro tip: my friend Priya learned the hard way that an entryway nook needs a washable liner, not just a washable cover — her dog’s bed soaked through to the wood floor underneath during a rainy week of muddy paw prints, and she ended up with a water stain she couldn’t fully get out.
12. Under-the-Bench Seating Nook (Dining Nook Adjacent)

Why it works: if you’ve got a breakfast nook or banquette seating, the gap underneath the bench seat is often just sitting empty, and it puts your dog’s spot in one of the more social parts of the house during meals without them being directly underfoot at the table.
How to do it: use a low-profile bed that fits the exact height clearance under your bench, and consider adding a short curtain or skirt along the front for a cleaner look if the space feels too exposed.
Pro tip: dogs that get excited around food will treat this spot as a front-row seat to begging, not a resting spot — this layout works best for calmer dogs or ones that are already solidly trained not to beg at the table.
13. Corner Tent Nook (No Renovation Required)
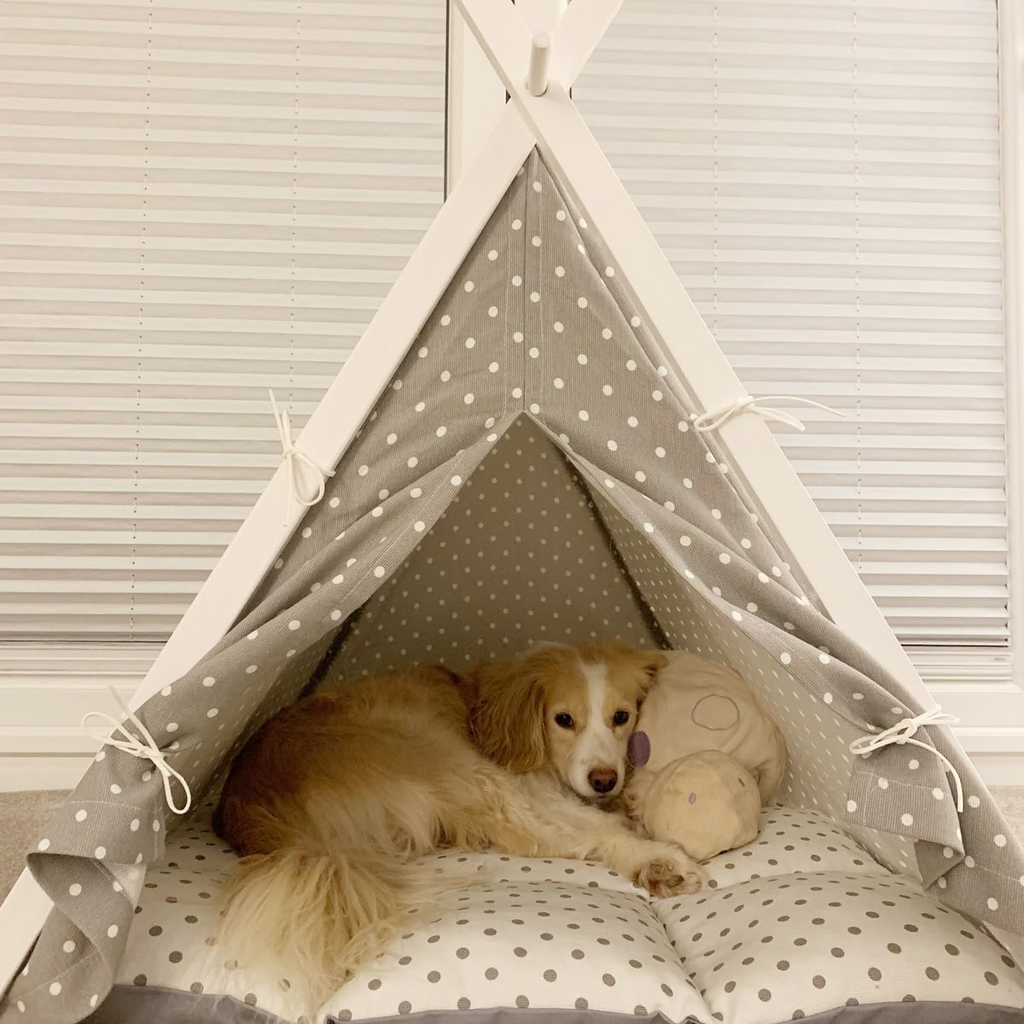
Why it works: this is the best option if you’re renting and can’t build anything into the wall or floor — a freestanding canvas or fabric dog tent gives you the “den” feeling of an enclosed nook without touching your actual walls, and you can move it if you change apartments.
How to do it: pick a corner with at least a little natural traffic flow nearby (not a totally isolated room your dog never enters), and size the tent to your dog plus a few extra inches, since an oversized tent loses some of the cozy, secure feeling that makes this style appealing in the first place.
Pro tip: look specifically for a tent with a removable, washable base pad rather than one where the flooring is sewn in — dog bedding needs to be washed a lot more often than most people expect, and a sewn-in base means washing the whole structure every time.
14. Repurposed TV Console Nook

Why it works: if you’ve downsized your TV or switched to a wall mount, an old media console with the doors removed is a genuinely good dog nook shell — it’s already the right general proportions, it’s usually sturdy furniture, and repurposing something you already own beats buying new.
How to do it: remove any doors, sand down rough edges or exposed hardware where doors used to attach, and add a cushion sized to the interior dimensions.
Pro tip: check for any leftover cable holes in the back panel before you finalize this as a nook — an open cable cutout at the back is an easy escape route for smaller dogs or a spot where a curious dog gets their head stuck, and it’s worth patching before the nook goes into regular use.
15. Sunroom or Three-Season Porch Nook
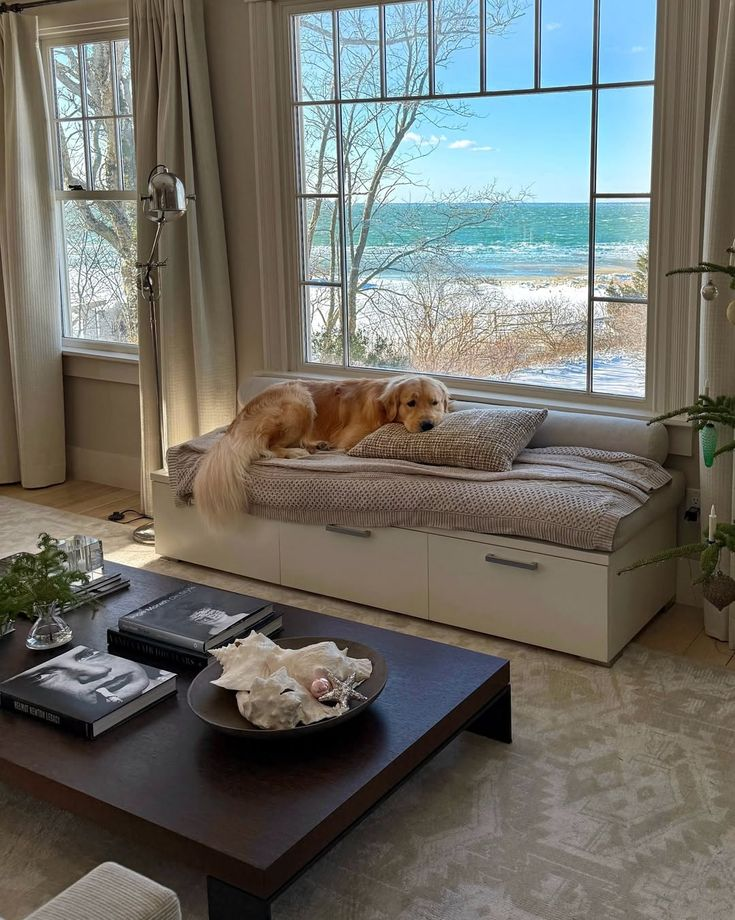
Why it works: if you’ve got a sunroom, this is one of the more genuinely luxurious options on the list — full daylight, usually a view outside, and enough separate square footage that you can build out a full dog “room” rather than just a corner cushion.
How to do it: check the room’s actual temperature range across seasons before committing a permanent bed setup here — a lot of sunrooms aren’t insulated the same as the rest of the house and swing much colder or hotter than you’d expect.
Pro tip: this is a great spot for older dogs with joint issues specifically, since morning sun and a slightly warmer room can genuinely help with stiffness — just make sure there’s also a shaded corner within the same room so they can move out of direct sun once it gets too warm.
16. Stair-Landing Window Nook (Combined Layout)

Why it works: combining a stair landing with a window seat gives you two of the best nook qualities at once — the enclosed, tucked-away feeling of a landing plus the mental stimulation of a view — and it’s a genuinely efficient use of a space most houses already have and do nothing with.
How to do it: this one usually requires a custom-built bench cut to the exact landing dimensions, since off-the-shelf furniture rarely fits an oddly shaped landing space cleanly.
Pro tip: budget for a custom cut here rather than trying to force a standard bench to fit — I’ve seen this go wrong more than once, where someone jams a rectangular bench into an irregular landing and ends up with awkward gaps that just become dust traps.
17. Garage or Mudroom Crate Nook Combo
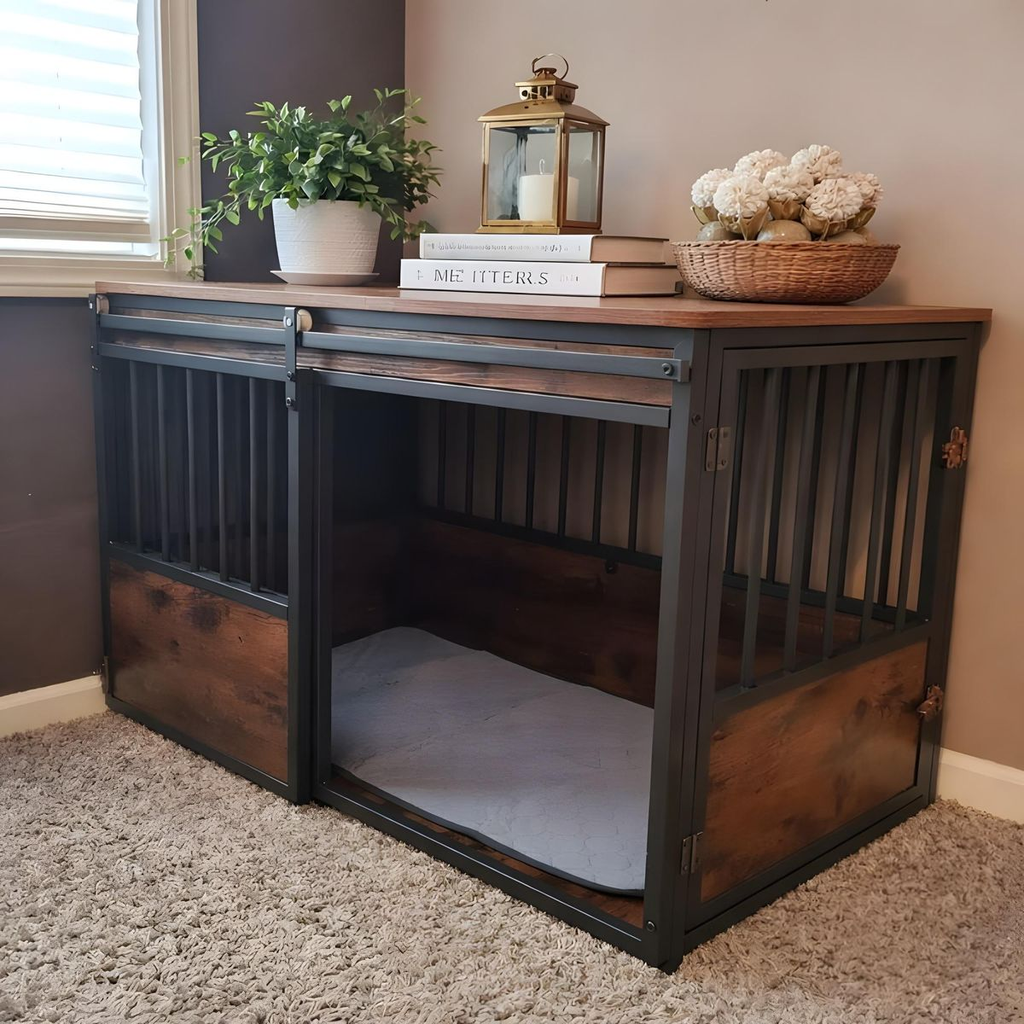
Why it works: for dogs that are still crate trained or crate-comfortable, building a nook around the existing crate — rather than replacing it — gives you the structure of crate training with the aesthetics of an actual designed space, so it doesn’t look like a wire cage sitting in the middle of a room.
How to do it: build a simple wood frame or cabinet-style enclosure around the crate’s existing dimensions, leaving the crate door fully functional and easy to open, and add ventilation gaps on at least two sides.
Pro tip: don’t skip a temperature check on this one either, especially in a garage — unfinished garages run much hotter and colder than the rest of the house, and a crate nook out there needs real insulation consideration, not just a design one.
18. Bay Window Floor Nook (No Bench Required)
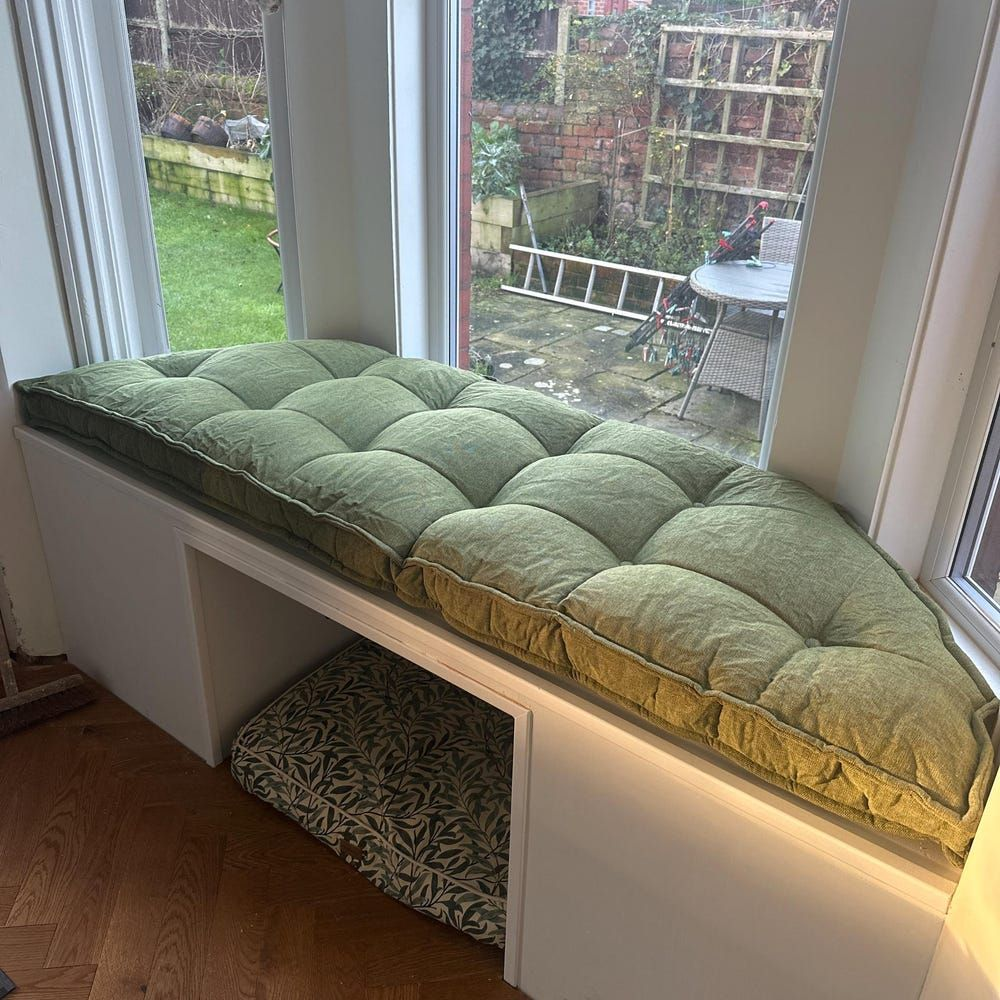
Why it works: if you’ve got a bay window but don’t want to build out a full bench, just adding a low floor cushion in the recessed area still captures most of the appeal — good light, a slightly separated feel from the rest of the room — without the cost or commitment of built-in furniture.
How to do it: measure the recessed floor space specifically, since bay windows often have a smaller usable footprint than the window itself suggests once you account for the wall angle.
Pro tip: rotate or flip the cushion cover every few weeks if this spot gets a lot of direct sun. Fading is faster than people expect in a south-facing bay window, and a nook bed that fades unevenly starts looking shabby well before it’s actually worn out.
19. Under-the-Stairs Drawer-Style Nook (Pull-Out)

Why it works: this is a more built-out version of the classic under-stairs nook — instead of an open cubby, the bed sits on a shallow pull-out drawer mechanism, which means you can tuck it away flush with the stairs when you want a totally clean look and pull it out when your dog wants to use it.
How to do it: this genuinely needs a carpenter or a solid DIY woodworking background, since you’re building a functional drawer system rated to hold a dog’s full weight repeatedly — this isn’t the project to improvise with generic drawer slides rated for office supplies.
Pro tip: budget for this one realistically. It’s the most expensive and most involved build on this list, and it only makes sense if the “hide it away” feature is something you’d actually use — if you don’t care about tucking the nook away, a standard open under-stairs build gets you 90% of the look for a fraction of the cost and effort.
20. Balcony or Patio Covered Nook

Why it works: for dogs that like being outside but need some protection from direct sun or light rain, a covered corner of a balcony or patio extends their nook options outdoors, which matters more than people think for dogs that get restless being fully indoor all day.
How to do it: use fully weatherproof bedding, not just a water-resistant cover, since even a covered outdoor spot gets more humidity and temperature swing than anything indoors.
Pro tip: check your balcony or patio surface temperature in direct sun before assuming this spot is comfortable — concrete and dark tile can get hot enough to be uncomfortable on paws well before the air temperature feels that warm to you.
21. Pet Gate Nook Divider (Open-Concept Homes)
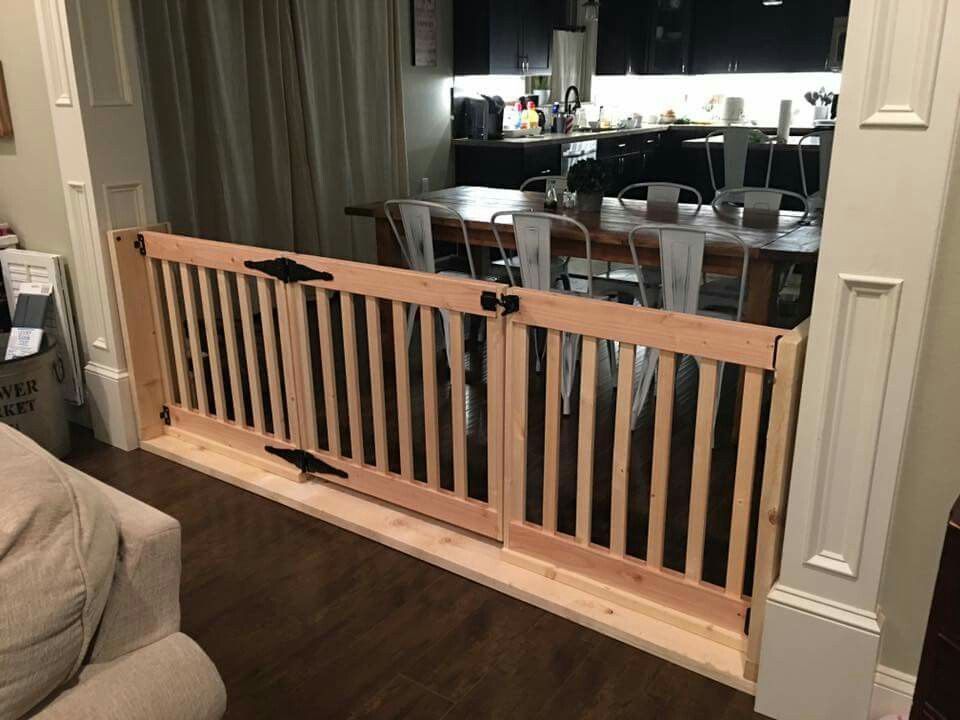
Why it works: in open-concept layouts without natural nook spaces like closets or stair triangles, a low decorative pet gate can carve out a defined corner nook from an otherwise wide-open room, giving your dog a sense of “this section is mine” even without walls to back it up.
How to do it: pick a gate style that matches your existing trim or furniture rather than a generic wire pet gate, since this is functioning as much as a design element here as it is a boundary.
Pro tip: leave the “nook” section open on at least one side rather than fully enclosing it with the gate — a fully boxed-in area in an open room can feel more like a timeout corner than a cozy spot, and some dogs pick up on that distinction more than owners expect.
22. Stacked Cubby Wall Nook (For Multi-Dog Households)
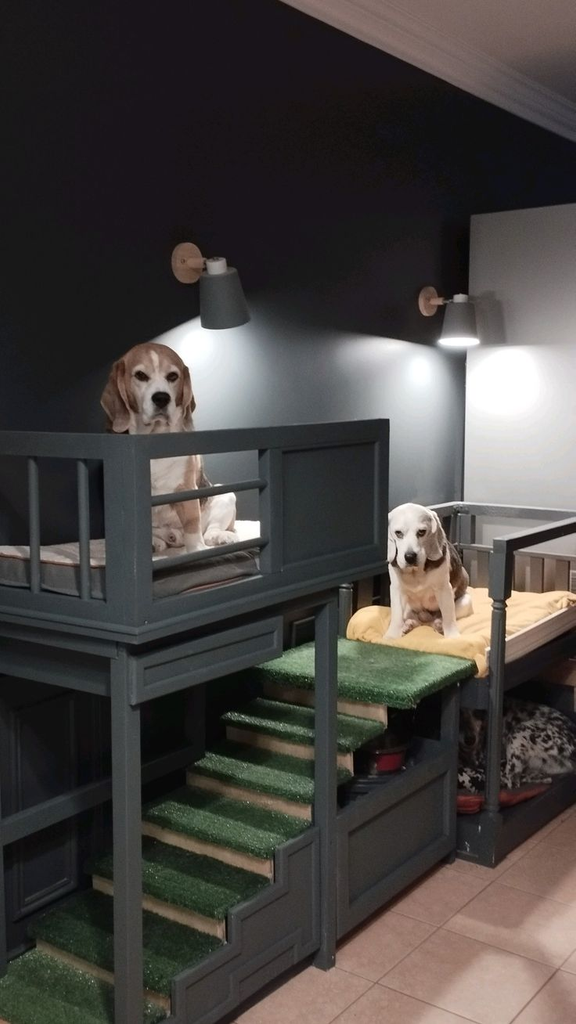
Why it works: if you’ve got more than one dog, a stacked or side-by-side cubby wall — think built-in bookshelf cubbies, but sized for dog beds — gives each dog a clearly separate spot instead of forcing them to share one nook, which cuts down on resource-guarding behavior around a shared resting spot.
How to do it: build or buy modular cubby units with a minimum of 3-4 inches of separation between individual dog-sized openings, and avoid stacking a nook directly above another if you’ve got dogs of different sizes or a dog with mobility concerns, since the lower dog can feel like they’re being “loomed over.”
Pro tip: introduce the cubbies gradually, one dog at a time if you can manage it, rather than all at once. A reader mentioned her two dogs initially both tried to claim the same cubby out of habit even with two identical options available, and it took about a week of gently redirecting before each dog settled into their own spot.
23. Minimalist Floating Shelf Bed Nook
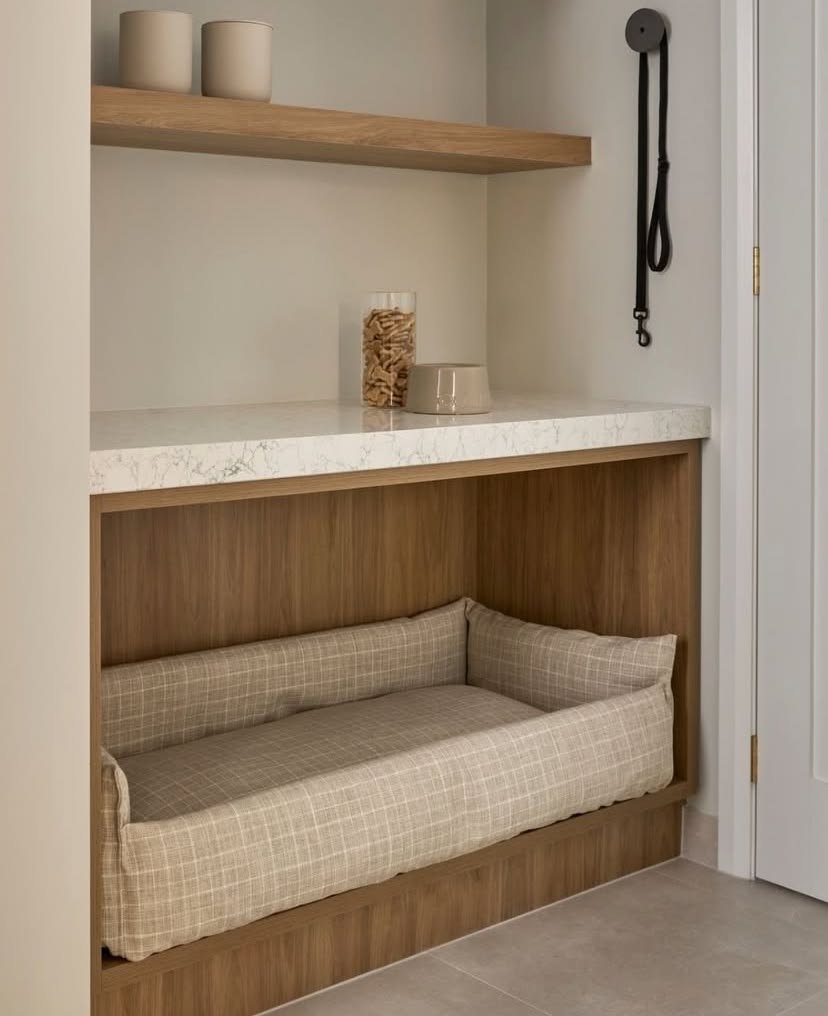
Why it works: this is the newest layout I’ve seen gaining real traction — a raised platform bed mounted to the wall like a floating shelf, sized for smaller dogs, that keeps the floor completely clear underneath. It’s a strong pick for small apartments where every square foot of actual floor space matters, and it reads as a genuine design piece rather than a pet accessory.
How to do it: this needs to be mounted into studs, not drywall anchors alone, given that it’s supporting a dog’s full weight plus movement, not a static decorative object — get this wrong and it’s a safety issue, not just an aesthetic one.
Pro tip: this only works for dogs under roughly 20-25 lbs and dogs that are confident on slightly elevated surfaces. I wouldn’t attempt this with a nervous or older dog that might hesitate or misjudge the edge — a low floor nook is the safer call for those dogs even if the floating shelf version looks nicer in photos.
What This Actually Costs
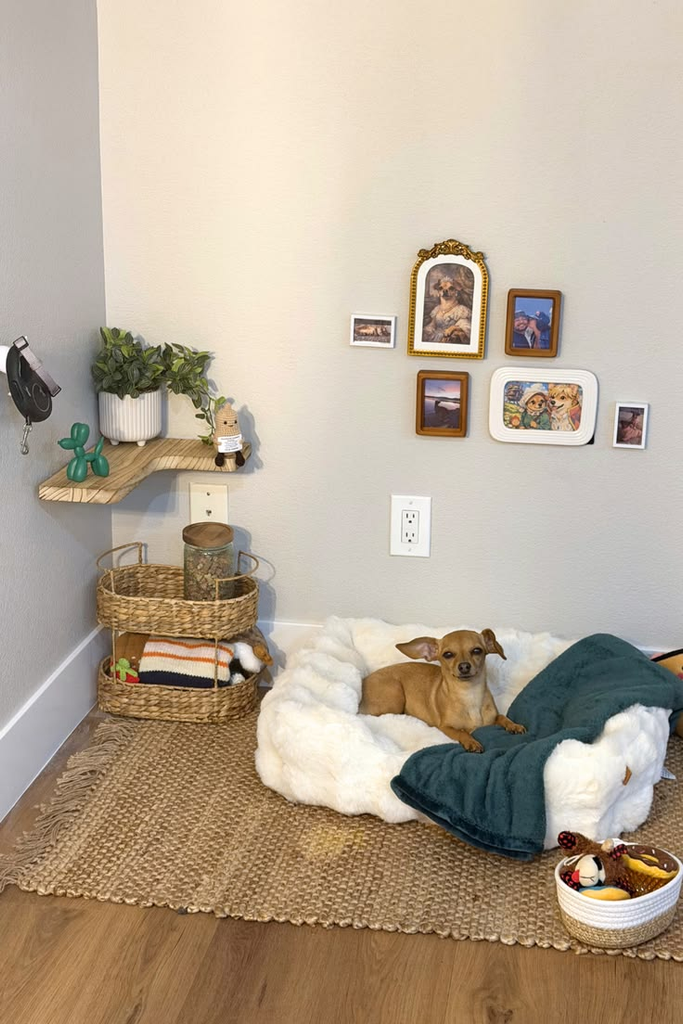
- Under $50: A corner tent, a floor cushion in an existing bay window or bookshelf gap, or a basic entryway bench cubby using furniture you already own.
- $50-150: A closet conversion, a mudroom platform bed, or a repurposed TV console nook — mostly labor and a bed insert rather than new furniture.
- $150-400: A custom under-stairs build, a fireplace alcove setup, or a stacked cubby system for multiple dogs — this range usually includes some carpentry, even if it’s DIY.
- $400+: Fully custom builds like a pull-out drawer nook, a built-in window bench sized to an irregular landing, or anything requiring a contractor or carpenter rather than weekend DIY.
Where I’d Start
If I were setting this up in my own place again, I’d start with whatever underused corner is already closest to where my dog naturally tries to hang out — for Biscuit, that would’ve been the base of the stairs, since that’s exactly where she kept defaulting to on her own. You don’t need to guess at the “right” spot from a design magazine.
Watch where your dog already tries to settle, even if it’s an inconvenient spot right now, and build the nook there instead of somewhere that just looks good in photos.
The dogs that actually use their nooks are the ones whose owners worked with their existing habits instead of against them.


Leave a Reply